Side-Lying Lateral Hip Stretch
Also called TFL Stretch · Side-lying · Tensor fasciae latae and outer hip
An assisted stretch for the tensor fasciae latae and outer hip, observing contact, stabilisation and compensation separately.
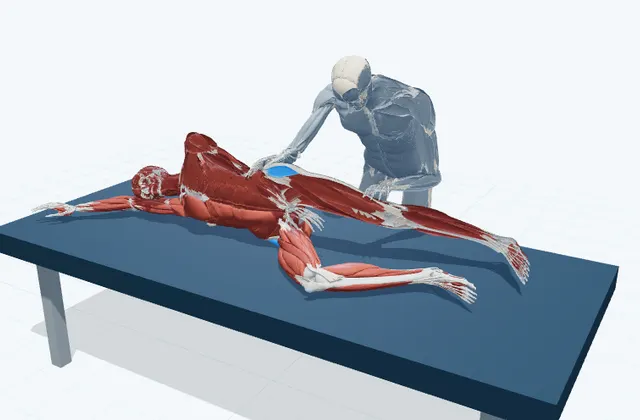
Position and focus
Side-lying · Tensor fasciae latae and outer hip
Starting position
The client lies on the right side with the lower leg bent. The trainer stands at the client's back.
Movement phases
1. Support the leg
Straighten the top leg and support it slightly behind the body.
2. Lower the leg
Holding the pelvis, lower the top leg towards the table.
3. Check the response
Check for a stretch from the outside of the thigh to the outside of the hip.
4. Return the leg
Support the leg and return it to the starting position.
What the trainer checks
Check that the pelvis is not rolling backwards and that the leg is not moving forwards.
Trainer information
Trainer position
Stand at the client's back with the feet staggered front to back.
Contact and support
Place the hands on the outside of the thigh (above the knee) and on the top edge of the pelvis.
Stabilisation
Lightly hold the top edge of the pelvis towards the head so it does not tip towards the feet as the leg lowers.
Compensation
The pelvis tipping towards the feet, posterior pelvic tilt, the leg moving forwards, side-bending of the lower back.
Easier option
Reduce the range and let the weight of the leg or arm rest on a cushion or the table. Go back to checking a pain-free starting position.
Cues and consent
Tell the client where you will touch and which way you will move, and say, 'Tell me straight away if you feel any pain or discomfort.' Confirm consent before touching and before moving.
Stop criteria
Return to the starting position immediately if the client reports sharp pain, numbness, weakness, a pinching feeling in the joint, dizziness, shortness of breath or anxiety, or asks to stop.
The sources include material for clinicians and carers. This 3D is not yet fully reviewed as a studio procedure and does not replace hands-on training. Do not perform unfamiliar techniques from the 3D alone.
Caution
Work within your qualifications, contract and studio procedures, and check medical history, medication and any pain before starting. This is not a substitute for diagnosis or treatment. Do not perform unfamiliar techniques from the 3D alone.
These English notes describe a prototype model. The stretch, foam roller and resistance band lessons are being produced under the supervision of CoconeRu. Move, reviewed in stages. They are not medical advice or an individual exercise prescription.
References
Each note describes what the whole source covers.
AAOS OrthoInfo — Hip Conditioning Program ↗
Crossing the legs beside a wall to stretch the outer hip, bringing the knee(s) towards the chest (one or both legs), and the back of the thigh lying down (with a towel if the hands do not reach).
This lesson was put together for this site from the methods for the same area in the sources above. It has not yet been reviewed by an expert.
About this page
It shows a typical way to do the movement. The 3D is a schematic model; it does not decide whether a lesson suits you, prescribe exercise or diagnose anything. Stop if you feel pain or discomfort.
Sources, supervision and revisions